How to view and change Wi-Fi settings on your Pulse media gateway

After your Pulse media gateway is installed by a Northwestel technician, your Wi-Fi network is set up and ready for you to use. There are some settings you may want to view or change at some point after installation.
These settings include your Wi-Fi network name (also called an SSID) and password (also called a passphrase or preshared key), and the Radio Frequency (RF) channel (also known as the Wi-Fi channel). You can also hide your Wi-Fi network name. This article shows you how to access the media gateway admin page and change these settings.
- Your username and password for the media gateway admin page.
- The default username is "admin". If you changed the username after installation, use the name you chose.
- The default password is "password". If you changed the password after installation, use the password you chose.
- A device and web browser connected to your Northwestel internet service.
- While connected to your Pulse wi-fi network, in a web browser type 192.168.0.1 in the address bar, and then press the Enter key on your keyboard.
-
Enter your username and password for the media gateway admin page, and then click Apply. If you have issues logging in, contact us at 1 888 423-2333.
From here, you can view or change your Wi-Fi network name, password, and radio frequency (RF) channel.
The default Wi-Fi network name is PULSE-<XXXX>, where <XXXX> is the last four characters of the MAC ID of the media gateway. If you want, you can change it to a more friendly name.
- Log in to the media gateway admin page (if you haven’t already).
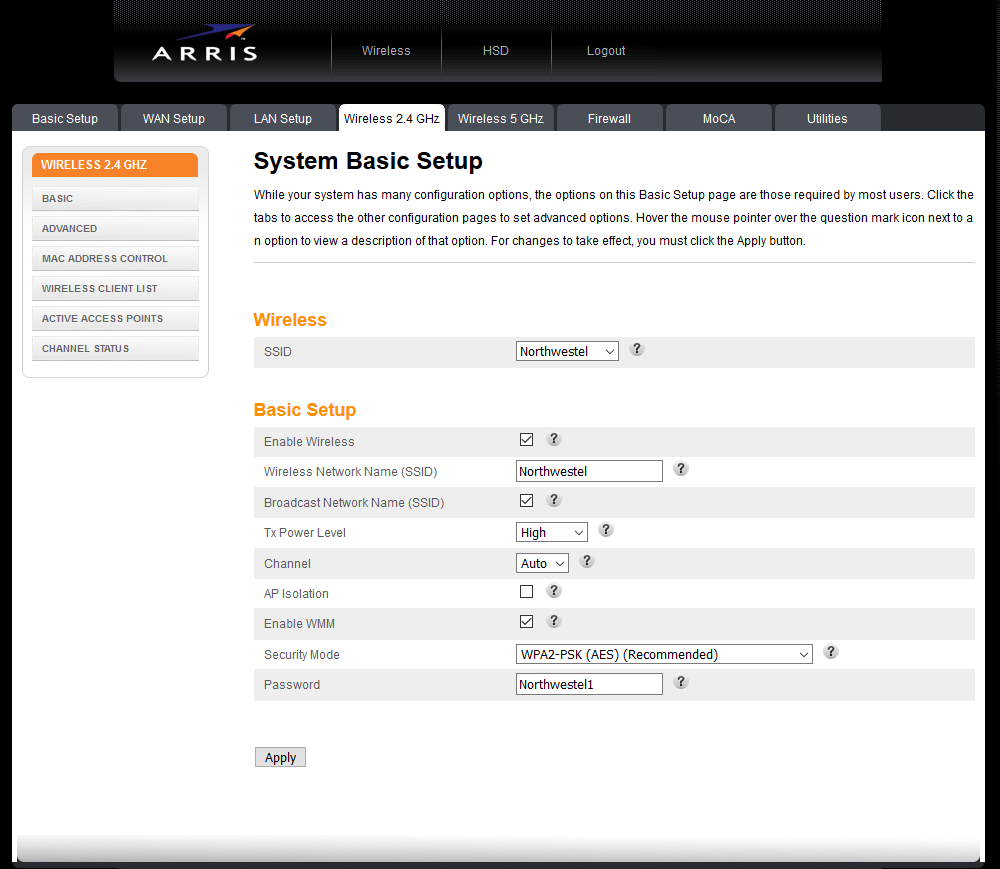
- Click the Wireless 2.4 GHz tab or the Wireless 5 GHz tab, depending on the Wi-Fi network you want to change.
- In the Wireless Network Name (SSID) box, enter the name you want.
- Click Apply.
Remember that after you change your Wi-Fi network name, you’ll have to update the Wi-Fi settings on your computer and devices to connect to your new Wi-Fi network name. If you don’t know where to find the Wi-Fi settings, see the documentation for your computer or device.
The default password is on a sticker at the back of the media gateway. You'll see it listed next to Preshared Key. You may want to change the password to something that’s more secure. It’s also a good idea to change the password from time to time to maintain security.
- Log in to the media gateway admin page (if you haven’t already).
- Click the Wireless 2.4 GHz tab or the Wireless 5 GHz tab, depending on the Wi-Fi network you want to change.
- Enter your new password.
Keep in mind that passwords are case-sensitive. You can use any of the following characters:- Uppercase letters (A to Z)
- Lowercase letters (a to z)
- Numbers (0 to 9)
- Special characters, including $ ! ? & # @
- Click Apply.
Remember that after you change your Wi-Fi password, you’ll have to update the Wi-Fi settings on your computer and devices to connect using the new password. If you don’t know where to find the Wi-Fi settings, see the documentation for your computer or device.
NOTE: this is an advanced feature.
If you’re experiencing interference with your Wi-Fi signal, such as from other Wi-Fi networks in your neighborhood, you can try changing the RF channel.
- Log in to the media gateway admin page (if you haven’t already).
- Click the Wireless 2.4 GHz tab or the Wireless 5 GHz tab, depending on the Wi-Fi network you want to change.
- On the left of the screen, click Active Access Points, and then select the Show as Table check box. Make a note of the channels that other Wi-Fi networks in your neighborhood are using.
- On the left of the screen, click Basic to go back to the previous screen.
- In the Channel box, select a channel that's different from the channel that other Wi-Fi networks in your neighborhood are using, and then click Apply.
Keep in mind that even though you switch channels, the channel you choose may be used by other Wi-Fi networks in your neighborhood at a later time.
- Log in to the media gateway admin page (if you haven’t already).
- Click the Wireless 2.4 GHz tab or the Wireless 5 GHz tab, depending on the Wi-Fi network you want to enable or disable.
- Do one of the following:
- To enable your Wi-Fi network, select the Enable wireless check box.
- To disable your Wi-Fi network, clear the Enable wireless check box.
NOTE: disabling your Wi-Fi will also disable any wireless media players.
- Click Apply.
You can hide your Wi-Fi network name, which makes your network name invisible to others (and yourself). When you do this, your network name won't appear in the list of nearby networks on wireless devices.
- Log in to the media gateway admin page (if you haven’t already).
- Click the Wireless 2.4 GHz tab or the Wireless 5 GHz tab, depending on the Wi-Fi network you want to hide or unhide.
- Do one of the following:
- To hide your Wi-Fi network name, clear the Broadcast Network Name (SSID) check box.
- To unhide your Wi-Fi network name, select the Broadcast Network Name (SSID) check box.
- Click Apply.
